Graphing Linear Equations Spiderwebs Halloween Math Activity


Spooky Spiderwebs with Linear Equations

Graphing Linear Equations is a skill that requires a lot of practice! This is a great differentiated lesson for your students to create Spiderweb designs! These make for great bulletin board displays for Halloween time! 

There are four different Spiderweb designs. 

  • Option 1: 1st Quadrant with the origin as the y-intercept
  • Option 2: 1st Quadrant with varying y-intercepts
  • Option 3: Four Quadrants with varying y-intercepts
  • Option 4: Four Quadrants with 1 as the y-intercept
You can choose to give one graph for your entire class or choose to give options to students from the four graphs. 

Example Spiderwebs Completed and Colored
Each spiderweb consists of student directions, a blank graph, a blank graph with inner webs for guidance, a completed graphed line example, and a completed web design using the given inner webs. 
Example Student Instructions
Example Blank Graph
Example Blank Graph
Example Blank Graph with Inner Webs
Example Completed Graphed Lines
Example Completed Web Design
Example Student Instructions Answer Key


You can give a blank graph to students to allow them to draw the inner web design on their own. This makes the activity more challenging! For your beginner learners you can give the graph with the inner webs to help ensure their lines are correct. This is a great way for self-checking their work!

How are you celebrating the Fall Season in your classroom? Leave me a comment below!

Get this for your classroom by clicking here! 

Click here to view other easy Halloween Math Activities for your classroom!

Spooky Linear Equations Halloween Math Activity


Spooky Spiderwebs Graphing Linear Equations


2 3 4 5 6
How to Easily Store Your Classroom Rulers with FREE Download


Let's talk classroom rulers. They are so needed and yet always seem to break. I find them slung onto a counter, on the floor, in the trash broken into pieces, etc. I have seen a few ways to store them. One being a Chips can(which is a great idea!) or in a tall jar. I do not have time to paint over a label and have not had much luck with the can withstanding more than a year of handling. I needed a plastic container long enough for the rulers to lay flat. In the past, I've put them diagonally in a plastic tub but I can't get the lid to shut all the way and only so many will fit!

I finally found the perfect solution!!

A PLASTIC CEREAL CONTAINER

Mind blown. It is PERFECT!!
I found my plastic container at Walmart. Here is a link to a similar one on Amazon.(Affiliate link)
Be sure when buying that you look at the dimensions. It needs to be more than 12 inches so your rulers will stand up straight! The one linked above is 13 inches tall.


What I LOVE about this container:
  • It is tall enough for the ruler to completely fit in the container straight up.
  • I have over 30 rulers in this!
  • There is a flip top for students to easily open and get one out. 
  • The rulers just slide back in once students are finished. 
  • There is an easy grip on the side so you can carry it around to hand out rulers. 
  • It fits perfectly on a shelf and looks tidy.
  • I can easily throw it in the dishwasher if it gets dirty.


I made a label to go on the outside that can be seen from across the room. It can be stored with the label facing out or front-facing. 
See instructions below on how to attach the label to the container as well as a FREE download!


STEP ONE: Print your label on whatever color paper you want to match your classroom. Cut the excess edges off. 


STEP TWO: Place a piece of rolled tape on the back to hold it in place while I put the contact paper on top. 

STEP THREE: Place the labels on your box. 


STEP FOUR: Cover with the clear contact paper and smooth out any bubbles.


STEP FIVE: Stand back and admire your amazing storage solution!! 


Standardized Testing Bulletin Board


The dreaded "testing season"......

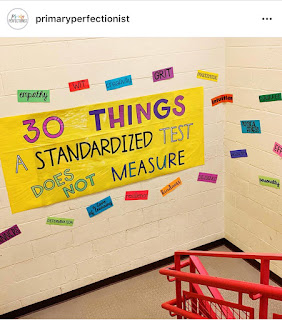
Remember your students have an incredible amount of butterflies about the standardized testing. Remind them that yes, it is important and they definitely should take the test seriously and try their hardest. I think it is so important to remind them that this one test does not define who they are. There are so many other things about them that this standardized test will not measure. 

This bulletin board came alive because we had to take down all content related decorations to prepare for testing. Instead of covering up my walls I decided to take everything down. Staring at a giant blank bulletin board is how this came to mind. At the time I was teaching 8th graders and they were incredibly nervous about passing the test. We were taking the test on computers(which was a new thing!) and it was all very confusing and new for everyone! You could almost feel the nerves fuming from everyone with the mention of the test. 

My hope was that this bulletin board eased some of the nerves of students and the teachers as well! I do believe that testing is important to measure growth but there are SO many other things that make a child special. 


This bulletin board kit is very easy to make and can be placed in a small corner of your room, on a door, a bulletin board, etc. You simply print on whatever color paper you want and cut a straight line between the words. 

What are some words you would add to this?


Here are a few teacher shared examples below! 

Ms. Pittaluga has a great example on a small board.

I love the colors that Dana used!

Third Grade Gifts nailed her board!

Whitney's board looks fabulous!

Ellen did a review packet challenge with stickers!

Andrea did a great job!!

Quinlan used awesome wood grain paper for her board!

I love how Ms. James used a blue border to tie it together!

Michelle shared this from her daughter's school!

I love the polka dot paper Coffee & Pi used!

Love the colored pencil border Mrs. Conner used!

Brit used a space in the hallway for her display!


Sudoku Interactive Bulletin Board Pictures shared by Teachers


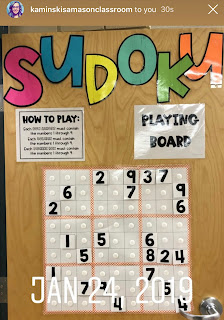
I LOVE seeing the creativity of teachers. Everyone is so different and takes a different spin on ideas to make it their own and to fit their classroom style and needs. I first made this Sudoku Interactive Bulletin Board back in 2014. I have tweaked it a few times after figuring out what worked and didn't work so it makes me SO incredibly happy to see how you teachers out there are making it work for your classrooms!

Here are some pictures below that teachers have tagged me in on Instagram of their versions of the Sudoku Interactive Bulletin Board. Thank you to all the teachers who have shared their amazing classrooms with me!


Ms. Hayley has a great poster version!


Ms. Megan used colorful washi tape as border!


Mr. Matt shows that even male teachers can have a colorful board!


Ms. Megan has a cute fabric banner to compliment her board! Look at all those students! 


Mrs. Manley found a small area of a cabinet that worked perfectly! The hanging baskets are a great way to store the extra pieces! 


Ms. Catherine incorporated her Harry Potter theme into her board!


Ms. Brittany used page protectors to store her extra pieces and the black border tape makes it pop!


Rocky Mountain Classroom used great colors! Look at those students!!


Ms. Welldone did a great job using tissue paper flowers to accent her board!


mrsbp_bhs used magnets on the back and put her board on a whiteboard! So smart! I love how she used different colors for the 3x3 grids! 


Ms. Campbell used a pocket chart to hold her extra pieces and space on a door for her board!


math.coffee.and.fun shared how she uses her board in her classroom saying the following:
"Our classroom interactive Sudoku board. I have always loved Sudoku puzzles and would try to take a day each school year to teach my students how to complete one. Many of them have a first reaction of, “I don’t know how to do those. They look too confusing and they have to do with math.” I promise them that they will be able to complete one by the end of class (I always start one with the class, let those who know what they are doing take off on their own, and will continue to work through it with those that are fearful to do it on their own) and that it isn’t as math heavy as they think (a little white lie 🤫). When I saw the Sudoku board by @activityaftermath I knew that I had to have it in my intervention room. My students who tend to struggle with math or have low math confidence were really reluctant to try it, but now we are on our 3rd puzzle in a matter of a month and a few of them even told me that they have downloaded a Sudoku app on their phone. I love that it creates an interactive board for each of my classes to build upon and it is another tool that I use to trick my students into loving numbers! 😉"

Thank you so much for supporting me and sharing your classrooms! I'd love to see your Sudoku Boards as well! You can tag me on Instagram @activityaftermath or email them to me at activityaftermath@gmail.com. I'll add them to this post!